We have some bad news.

Hello Kerbalnauts,

We are very sad to announce that at 15:13:12 (3:13:12 pm) on November 26, 2014 we received message from Jebadiah Kerman: "I am stuck on planet. It is pretty dark here. Can you guys please pick me up?". We have no clue where he is but we are going to be working really hard trying to finish up the cockpit control panel and rebuild mission control.

We will not stop until we find him... We will scour every planet and every moon in the Kerbal system if we have to.

Jeb, we know that you cannot read this, or maybe you can but understand this we will get you back home!

We've made some Spaghetti!

Hello Kerbalnauts,

We have been on the other side of the Mun recently dealing with system errors and catastrophic explosions, but we are making some progress.


Today was a big day for us, we wired several of the buttons/switches and proved we can do it. That is, until we ran out of wire (I'm gonna fire the guy who orders stuff, because we are missing 3 switches too!) And so, here is some of the pictures of the progress we have made.

Fig 1: What the damn thing is supposed to look like.


Fig 2: What actually happened!


Fig 3: It just looks like spaghetti!


There maaaaaay be some slight rewiring that has to be done, but believe it or not this works for now. We're gonna have to go back around the dark side of the moon pretty soon here, but will be back in mid December to answer questions and finish this monstrosity up.


Painted and Ready to Go.

Hello Kerbalnauts,

We are pleased to present you with the control panel painted.


Next step is to design and print the trays for all the buttons and cut out the holes for the trays in the control panel.

Lift-Off

Hello Kerbalnauts,

We are going to 'Launch' The Rocket Science tab off with the first step to making a good rocket.
To start getting off the ground we will need to perform apply Newton's 2nd law(Force Balance) on the rocket. To do this we will need to examine what forces exist:
From these forces we can see that the force of drag will be zero at lift off because the Velocity(V) is zero, and that the only forces involved in keeping our rockets from taking off are the Gravity and Thrust.
Conclusion:
The Force of Thrust(Ft) must be larger then the total mass(m) of the Rocket times the gravity(g) of the current planet (g = 9.81 on Kerbin).

It's not like it's Rocket Science

Hello Kerbalnauts,

We are proud to introduce to you the "Rocket Science" tab...

It will be a place were all of our collective posts involving the calculations for our mission control will be.

This will include calculations like required fuel thrust calculation.

And even all the calculations to produce a circularized orbit around a body and even for producing a transfer from one body to another.

Buttons, Joystick and Switches

Hello Kerbalnauts,

All of our buttons, switches and our joystick have arrived, and they look great...


Not Everything went perfectly with the buttons and switches thought... the momentary switches are a little fragile, and the spring mechanism can break during operation i.e. we already broke one.
 We are going to try to 3d print the replacement part or produce a much stronger one out of a non-conductive metal.

Now that we have every piece, they must be measured for their dimensions such that we can 3d print the trays they sit in.

Snake in the Grass

Hello Kerbalnauts,

Do to major trouble with the porting of the MatLab code to Octave(It's just not as up to date as MatLab) we are sad to announce that the using octave, at the moment is not an option.

And because of licencing issues with MatLab and Mathworks we will not be releasing compiled(.exe) versions of the MatLab code...

We are however trying to port the MatLab code into Python or javascript to still be able to provide an open source alternative.

We have our two best coders on the job, both trying to learn these languages to produce the code as fast as possible.

Keep watching for our updates on the coding progress. And we will still be providing the MatLab *.m files for those who have access to MatLab.

The Programming


We are pleased to present you with the latest discovery in computer communication....


We have found an easy alternative on how to get the Arduino to communicate with the computer through MatLab... i.e. matlab them-selves have designed a program to do just that.

The only things we have to do is modify the code on the MatLab side to except more functions(e.g. lcd.Write) and "completely" rewrite the one on the arduino side to accommodate only the functions we need(no need for communiction to encoders or servos...yet) and to add the support for functions like lcd.write.

For the next few steps we needed the specific programs:
We will need a text-editor (notepad on windows does work but I prefer notepad++ for its functionallity) to be able to edit the code for MatLab, and the program for the arduino.

The package that contains the program files to communicate with the arduino are available to download at Mathworks.

From the package there are only two file that are needed:
1) arduino.m
And from the pde folder
2) adio.pde

To link MatLab to the arduino you will need to:
1) connect the arduino to the computer
2) open the adio.pde in the arduino software
3) upload the program to the arduino
4) check the com port by going to tools and serial
5) open matlab and close the arduino software
6) cd to where you have the arduino.m file
    6.1) find the directory by right clicking and selecting properties and copying the text next to "Location:"
    6.2) type "cd( ' **the location** ' )" press enter
7) type "a=arduino ('COM#')" and press enter (COM# is the com port you found earlier)

You will now be linked to the Arduino.
You will be able to set the pin states and read and write to the pins.

Building a Frame

Hello Kerbalnauts,

After agreeing on the look of the concept design, we have gone ahead and cut all the pieces out of plywood and fastened it together.

After cutting the pieces out and starting to fasten them together it became apparent that the back could remain open, providing easy access to the internals and electronics, without weakening the structures integrity to a point where it would feel flimsy.


The final look is pretty well spot on to the original design (minus the back covers and the addition of two end plates, one on each side of the controller). But overall we are very pleased with the look of the main body.


Brains Behind the Controller

Hello Kerbalnauts,

We are pleased to present to you the brains behind the Kerbal Controller... The Arduino microcontroller.

For this project we are using an official Arduino Uno R3 and,

A SainSmart Mega2650 R3 development board(arduino clone).
The plan is to use the two board in conjunction with one another; 1 board will handle all the button presses and switch toggles (inputs) and the other board will handle all the LEDs and LCD displays (outputs).

We are using a program called GNU Octave(open source alternative to MatLab) to open a serial connection to the arduino. This will allow us to communicate with the arduino sending the data to the LCDs and the states to the LEDs. It will also allow us to see what states the buttons/switches are in.
Once we have the state at which a button is in we can then update the data in Kerbal Space program by uploading the data through the Telemachus mod.

Just a Concept

Hello Kerbalnauts,

Here is our Design Concept for the controller.

For some more information on some of the concepts present in the picture please check out our original post on reddit or for general inquiries/comments please leave them as a comment or private message us.

Note: The hole in the center is for a flight joystick to sit.

The Beginning

Hello Kerbalnauts,

This blog has been started to help show the progress of a Kerbal Space Program custom controller. It is also a place where people can ask questions and make suggestions for the current and possible future builds.

We will try and answer every question to the best of our knowledge, and hopefully help you with your future Kerbal builds/missions.

If you have any specific questions on the controller or Kerbal in general, one can private message us and we will get back to you as soon as possible.

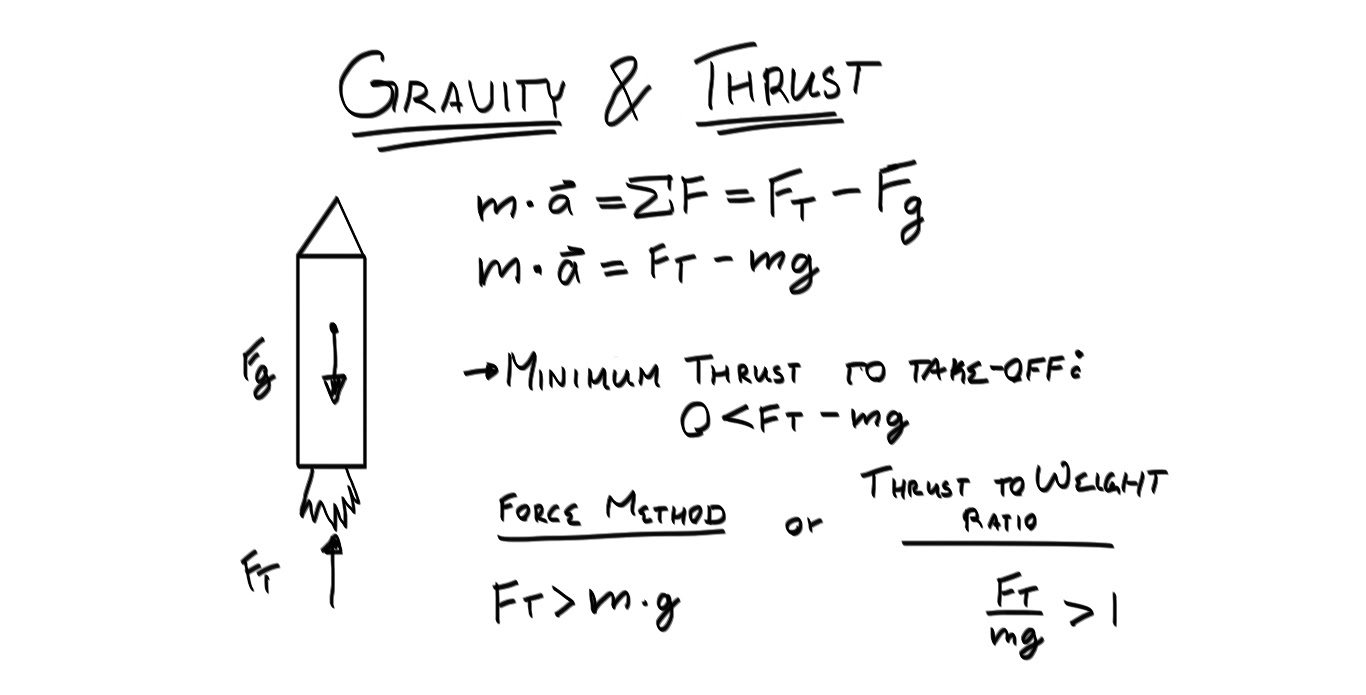
We will even help with the calculations and algorithms used for the mission control(see below).

Background:
-Me and my friend are both Mechanical Engineering students.
-He will be handling a majority of the physical building of the box and solid modeling.
-I will be handling alot of the computer coding, optimizing, and electrical work
Goals:
-To have a fully functioning Kerbal Controller which can be used instead of the traditional mouse and keyboard.
-To produce a functioning Mission Control to guide the Kerbalnauts (people controlling the vessel) to their required destination by making tools available to simplify the process of "doing rocket science"
-To make Kerbal Space Program an even more emersive experience and provide a solution to the lack of a multiplayer experience.

Hardware:
-Arduino: world famous open source microcontroller.
-Arduino Clones: a copy of above.
Software:
-GNU Octave/MatLab: to do a majority of the heavy lifting and communicating with the arduino.
-Arduino UI: to upload our custom programing to the arduino.

Mods:
-Telemachus: will be used to send out the data from the kerbal game to a retrievable format.
P.S. At the time of writing this we have already made some progress on the designing and as such multiple posts may appear in a very short amount of time. This is not to be taken as a rate at which work is being completed.